|
Computer processor thermal pastes are usually replaced for two main reasons:
Improved heat conductivity: The processor thermal paste is a substance that is applied between the processor and the cooling system. Its purpose is to enhance heat conductivity. Over time, the thermal paste can dry out, harden, or lose its effectiveness, which diminishes its ability to transfer heat from the processor to the cooling system. This can lead to processor overheating and reduced performance. Replacing the thermal paste with a new one can improve heat conductivity and ensure that the processor stays sufficiently cool.
Maintenance and upkeep: Replacing the processor thermal paste can be part of general maintenance and upkeep for a laptop computer. Regular cleaning and thermal paste replacement can help keep the laptop computer in working order and prevent potential issues such as overheating or decreased performance.
It's important to note that replacing the processor thermal paste requires precision and carefulness. If you're unsure of your skills or don't feel confident, it's recommended to seek assistance from a professional.
Replacing processor thermal pastes in a laptop computer is a fairly straightforward process. Follow these instructions:
- First, make sure you have a new processor thermal paste that is compatible with your laptop's processor.
- Shut down the laptop computer and disconnect the power cord and battery. This is important for safety reasons and to prevent any accidental damage.
- Locate the processor cooling system on the bottom of the laptop computer. It is usually under a protective cover or behind a door on the back of the computer. If you're unsure, you can refer to your computer's manual or search online for more detailed instructions.
- Once you've found the processor cooling system, carefully remove it. It is typically secured with screws or clips. If necessary, you can use a screwdriver or another suitable tool.
- With the processor cooling system removed, you'll be able to see the processor and the old thermal paste. Use a soft cloth or alcohol wipes to carefully clean off the old thermal paste from the processor and cooling system. Make sure to clean off any residue thoroughly and allow the surface to dry before proceeding to the next step.
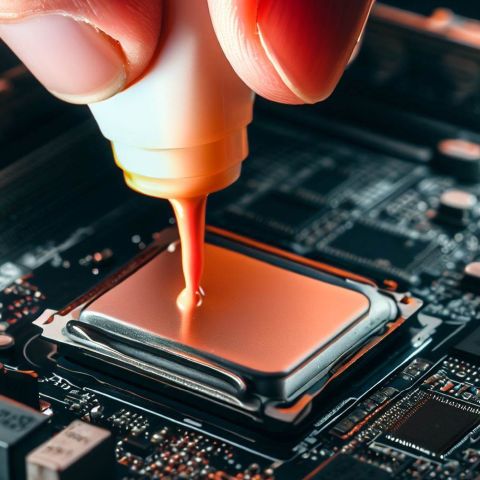
- Once the surface is clean, take the new processor thermal paste and apply a thin layer to the surface of the processor. You can use a specialized thermal paste application tool or something like the corner of a small plastic card. Ensure that you apply an even, thin layer for efficient heat transfer.
- Reinstall the processor cooling system and secure it tightly with screws or clips. Make sure it fits snugly in place for proper heat transfer.
- Now you can reassemble the computer, remembering to reconnect the battery, plug in the laptop's power cord, and start it up normally.
With these instructions, you should be able to successfully replace the processor thermal paste in a laptop computer. However, remember to exercise caution and follow all safety guidelines. If you have any doubts, we recommend contacting a professional who can assist you with the replacement process. Good luck!
Contact us, and we will help you replace the thermal paste in your computer!
- Thermal paste replacement
- Changing thermal paste on laptop processor
- How to replace thermal paste on a laptop
- Laptop processor thermal paste upgrade
- Guide to changing thermal paste on laptop CPU
- Laptop maintenance: replacing thermal paste
- Improving laptop cooling with new thermal paste
- Step-by-step tutorial: laptop thermal paste replacement
- Best practices for changing laptop CPU thermal paste
- DIY laptop processor thermal paste upgrade
|

